Step-by-step guide
Method 1: Add an image to the Course Information area or for any topic area
NOTE: This works for any topic area in your course
- Log in to OnCourse.
- Access the course that you would like to add a picture to.
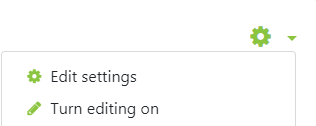
- Press the "Turn editing on. Locate the green gear icon " button on the upper right hand side of the page. From the drop-down menu select Turn editing on.
- In the Course Information area or the topic area for the image to appear, click Edit, "Edit Section" or "Edit topic."
- In the Summary field, click the Insert/edit Image button
- Press the Browse repositories button to locate the saved image that you want to use (previously saved on your computer).
- It is recommended that the width of the image be no more than 120px
- It is recommended that the width of the image be no more than 120px
- Press Choose File
- Locate the file and press the Upload File button
- Enter a description in the "Image Description" field
- Press Insert
- The image will appear in the Summary field
- Press Save Changes
Method 2: Add an image to an HTML Block
- Access the course that you would like to add a picture to
- In the top upper right-hand corner, locate the green gear icon. From the drop-down menu select press the "Turn editing on" button.
- In the bottom left-hand corner, locate the Add A Block block
- From the Add A Block drop-down menu, choose "HTML"
- Locate the block that was added; it is called "(New HTML Block)"
- Click the gear icon in the block and choose "Configure (New HTML Block)" block
- Enter in a Block Title. If you leave the block title blank there will be no title above the image
In the Content field, click the "Insert/edit Image" button
- Press the Browse repositories button to locate the saved image that you want to use (previously saved on your computer).
- Press Choose File
- Locate the file and press the Upload File button
- Enter a description in the "Image Description" field
- Press Insert
The image will appear in the Content field. Press Save Changes
Using the four-way arrow in the HTML block, you can move the block to any location in the left- and right-hand columns of your course.
| Info |
|---|
Hints:
Resources:
|
Short URL to this page:
...
| Live Search | ||||||||
|---|---|---|---|---|---|---|---|---|
|
...
