How do I copy individual content items from one course to another?
These instructions will show you how to copy individual content items from one course to another. To see how to copy an entire course,click here please view Copying Course Content in OnCourse.
Step-by-step guide
- Open the course you would like to import the content to.
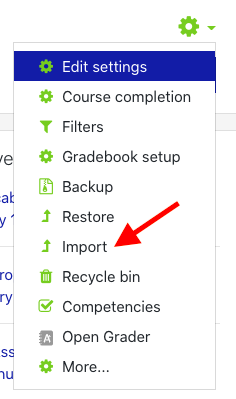
- Locate the green gear icon on the upper right hand side of the page. From the drop-down menu, click the Import link.
- Locate the course you would like to copy.
If the course name does not appear in the first 10 listed, use the search box to locate the course to copy from.
- If you are searching for a course that was migrated from ANGEL, you will need to search using the semester code first. For example, MATH-110 from Fall 2015 would be search using “201530-MATH-110.”
- Semester codes are the year followed by 05 for JTerm, 10 for Spring, 20 for Summer, and 30 for Fall. Examples:
- 201605 = JTerm 2016
- 201610 = Spring 2016
- 201520 = Summer 2015
- 201530 = Fall 2015
- 201605 = JTerm 2016
Click the radio button next to the course name and press Continue.
- On the Initial Settings page, under Backup Settings, check the types of content to be copied.
- By default all items will be selected, only change this if you would like to exclude a particular type of content from the copy.
- The items under the Personalized Learning Designer Settings section will be unchecked. If you have not used the PLD, this can remain unchecked.
- By default all items will be selected, only change this if you would like to exclude a particular type of content from the copy.
- Click the Next button.
- On the Schema Settings page click the None option at the top, this will deselect all of the content items.
- Scroll through the list and locate the item(s) to be copied. Place a checkmark next to the section that contains the items and then place checkmarks next to the item(s) to be copied.
- Click the Next button.
On the next page, the items that will be copied will have green checks next to the titles. Items with red Xs will not be copied.
- Click the Perform Import button.
- If you need to make changes, click the Previous button to return to the selection screen.
- If you need to make changes, click the Previous button to return to the selection screen.
- A progress bar will appear, once the bar disappears the import is complete.
The imported content will appear in the same section as it existed in the original course. If this is not where it belongs, turn on editing and use the move icon next to the content item name to drag and drop the item where it belongs.
Short URL to this page:
...
| Live Search | ||||||||
|---|---|---|---|---|---|---|---|---|
|
...
