How can I take attendance in OnCourse?
Step-by-step guide
Adding an Attendance Activity
- Access the course the Attendance belongs in and turn on editing. To turn editing on, locate the green gear icon on the upper right hand side of the page. From the drop-down menu select Turn editing on.
- Locate the section to add the Attendance to and press the “Add an activity or resource” link.
- Choose Attendance from the options and press Add.
General
- Fill in the "Name: field. By default this is called Attendance, but this can be modified if necessary.
Grade
If Attendance will be added to the gradebook, "Point" should be selected in the "Type" drop-down menu. If attendance should not be automatically added to the gradebook change the "Type" drop-down menu to "None."
- Type: Choose Point if attendance will count in the gradebook. Choose None if attendance will not count in the gradebook.
- Maximum Grade: Enter in the maximum grade a student can earn for the entire attendance cycle. If 2 points is given for each class attended and there are 45 meetings then the Maximum Grade would be 90.
- Grade Category: Indicate which category the attendance grade should go in.
Press Save and display to continue setting up the Attendance activity.
Creating Sessions for Attendance
One session should be created for each day attendance will be taken.
- On your course main page, go into the Attendance activity you just added to your course. Click the Add Session tab.
- Enter in the first date and time attendance will be taken.
- Under Multiple Sessions select “Repeat the session above as follows.”
- Select the days of the week the course meets on, how often a course meets, and the end date in the Repeat Until area.
- Press Add.
Set Status Codes
By default the available status codes are Present (P), Late (L), Excused (E), and Absent(A). Each status may have a grade value. Any status can be removed or replaced.
- In the Attendance Activity, click the Status Set tab.
- In the Actions column click on the trash icon remove any status (Acronym) not needed.
- Using the empty row, add any needed statuses.
- For the remaining statuses, include a Point value.
- Press Update to save changes.
Record Sessions
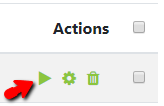
- In the Attendance activity click the green arrow under the Actions column to enter attendance for a session.
- If the session you are looking for does not appear, adjust the date range above the session list.
- Mark the status for each student, or mark the most common status by using the top row, and then changing the students not receiving the same status.
- Press the “Save attendance” button when done.
Viewing Attendance
Instructor:
- In the Attendance activity click the report tab to see the attendance of the entire class.
- To see an individual student’s attendance click the Report tab and then click on a single student’s name.
Student:
- By clicking the Attendance activity link in the course, a student will be able to view their own attendance record.
Hints:
- Turn off Activity Completion for the Attendance option. Since attendance will be taken over a span of time, this isn’t a necessary item.
- Generally a course meets every week so the “Repeat every week(s)” option should be set to 1.
Resources:
- For more examples visit: https://www.umass.edu/it/support/moodle/record-attendance-moodle.
Short URL to this page:
Related articles


