EdTPA Information, Procedures, and Tips
Where Can you go for Help?
Location and Contact Information
The ITS Service Center
W203 Thompson Hall
(716) 673-3407
ITS.ServiceCenter@fredonia.edu
What can we help with?
- Reserving equipment - https://checkout.fredonia.edu
- iPads
- Cameras
- Tripods
- Uploading your video to Google Drive
- Editing of the video
What can’t we help with?
- Figuring out specific edTPA requirements. That is best left to your Professors
- Helping submit your project to the EdTPA website
Checkout Procedures
- iPads may only be checked out for a maximum of 2 weeks straight.
- Once iPads are returned, there is a 24 hour wait period before they can be checked out again by the same user to ensure that all students have access to an iPad.
- Once the iPad is handed over, all of the information on the iPad is going to be lost. Our office will be clearing all videos, and logging out of all Google Drive sessions.
Tip ** If you need to borrow an iPad from the Service Center, please check that the iPad has the edTPA folder which contains the MoviePro, Photos, and GDrive apps. Also, confirm the MoviePro settings at the time of checkout. It is a good idea to ensure that you can log into FREDsecure and your Google account before leaving the Service Center. Those behind the counter will be able to assist you with all of this.
Filming Your Video
What will be evaluated?
- Up to 20 minutes of uninterrupted video that includes:
- Your lesson
- Interactions between you and your students
- Do NOT edit any of this video other than trimming the beginning or the end.
Setting Up Your Room
- Frame the entire front of the room
- Move around naturally
- Students should be in the shot
- Avoid windows behind the subjects as this may cause lighting problems
- Do a test shoot prior and review the footage for potential issues
What are the technical requirements?
- Format:
- .asf
- .avi
- .flv
- .m4v
- .mp4
- .mpeg
- .mpg
- .qt
- .wmv
- File Limits/Sizes:
- This will vary, consult your guidelines
- Typically this is 20 minutes and 500MB max.
- Make sure to change the resolution to 640x480 on most devices to keep file sizes down
Application We Support
- iPhone: MoviePro
- iPad: MoviePro
Your Video is Ready - What Now?
Storing your Video
- Do NOT upload your video to YouTube
- Use on of the following for storage:
- Google Drive
- Dropbox
- OneDrive
- Flash Drive
Uploading Video to Pearson
- Make sure to review the video before submitting. Watch the entire video as this is an important submission and you may have missed something initially
- When uploading, it is recommended to do this from a wired internet connection.
- It is faster to upload the large file on a wired connection
- It is less likely to fail due to connection errors
iPad Video Recording Quick Guide
Before Opening MoviePro
- Make sure that your iPad is setup to allow MoviePro to save to the iPad’s Camera Roll. Choose Settings -> Privacy -> Photos
- Turn access ON for MoviePro
- Return to the home screen, select the edTPA folder, and select MoviePro (If you are using a different iPad from an ITS Service Center iPad owned one, then your MoviePro, G Drive, and Google Drive apps may be in different locations. Find MoviePro on your iPad and select it.)
Operating MoviePro
- Select Settings
- Set Resolution to 640 x 480
- Set Video Quality to 75%
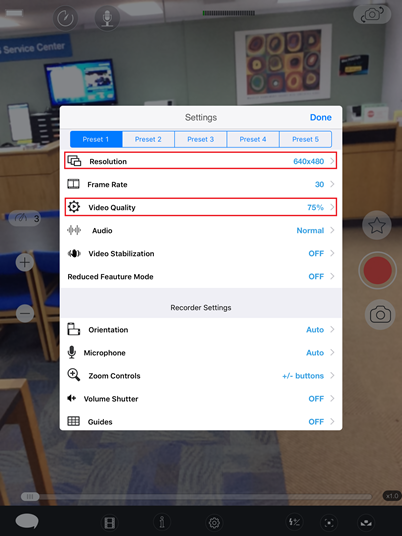
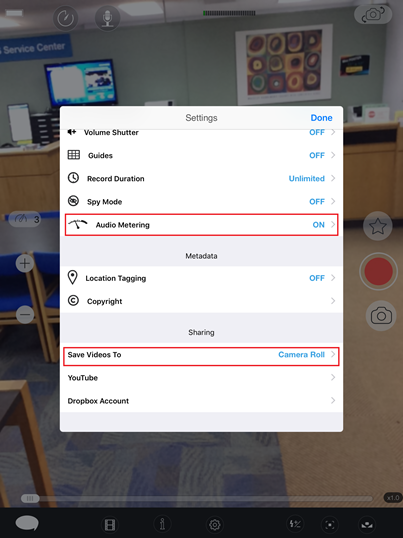
4. Under Recorder Settings, ensure Audio Metering is ON
5. Under Sharing, save videos to Camera Roll
6. Click Done
7. You are now ready to record, press the red button to begin recording. Press the red button again to stop your recording. Once you stop the recording, it will be saved automatically in Camera Roll.
Editing your iPad Video
If all settings are correct, MoviePro should automatically send all video to the iPad Camera Roll for editing.
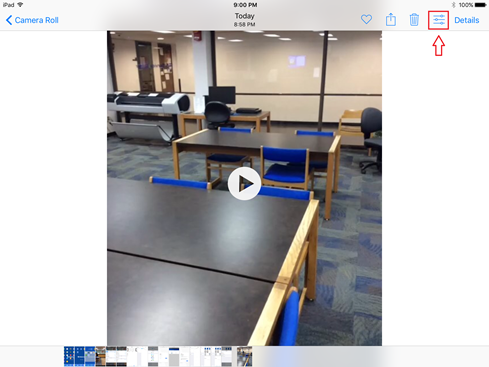
- From the edTPA folder, select the Photos application
- Under Albums, select Camera Roll
- Tap on the desired video to select it
- Click the settings button in the top right corner (as indicated in the picture by the red box)
5. Click and drag the arrows at the bottom of the screen to trim either the beginning or the end of the video. Anything within the yellow frame will be the completed video.
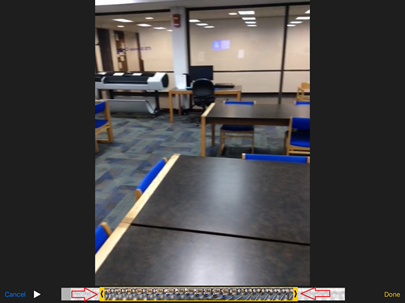
6. Click Done
7. Click “Save as new clip”
8. Your video has now been trimmed.
Uploading your Video to Google Drive
- Go back to your edTPA folder and select GDrive
- Click the “+” symbol at the top of the screen and select Google
- Enter your email address in full on the new screen that appears and click Next.
- Now login with your eServices Username and Password and click Sign In
- Click Allow to finish the login process
- Select Photo Library -> Camera Roll
- Select Edit in the top right corner then select the video you want to upload to Google Drive.
- Select “Copy to” at the bottom of the screen
- Click on your newly linked Google Drive account and then select a folder you want to save the video to
- Select Save.
- A progress bar will appear and, once it completes, your video will now be uploaded using GDrive.
URL for this document: https://goo.gl/TRDSc6