Merging Courses in OnCourse
How do I combine two sections of the same course, or a course that is cross listed?
Step-by-step guide
**If you would like groups created for each course being merged, complete these instructions first: Creating Groups When Merging**
- Log in to the course that you will use to manage the course content.
- It is recommended that the course with the lower section number becomes the main course.
- It is recommended that the course with the lower section number becomes the main course.
- **If you would like groups created for the two merged sections, complete this step first.** If you will not need two groups, proceed to Step 3.
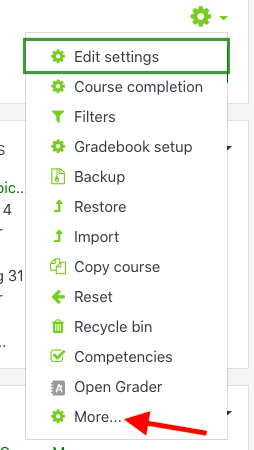
- Locate the green gear icon on the upper right hand side of the page. Click on the drop-down menu and select More.
- Click on the Users tab and then click the Groups link.
- Press the “Create group” button.
- Enter a Group name, usually the name of the section, press the Save Changes button at the bottom of the screen.
- Choose the group name in the Groups box and press the “Add/remove users” button under the Members box.
- Select all of the students in the section and press the Add button.
- When finished press the “Back to groups” button.
- You will create the second group in step 7.
- Locate the green gear icon on the upper right hand side of the page. Click on the drop-down menu and select More.
- Locate the green gear icon on the upper right hand side of the page. Click on the drop-down menu and select More.
- Click on the Users tab.
- Click the Enrollment Methods link.

- On the Enrollment Methods screen, use the Add Method drop down menu to add Course Meta Link.
- In the Link Course drop down menu, choose the course to merge with the existing course.
- If you are creating groups out of the merged sections, change the “Add to group” drop down menu to “Create new group.”
- If you are creating groups out of the merged sections, change the “Add to group” drop down menu to “Create new group.”
- Press the Add Method button. This will bring the students from the second course into the roster of the first course.
Next, you will rename the course to represent the merged sections:
- Locate the green gear icon on the upper right hand side of the page. Click on the drop-down menu and click Edit Settings.
- In the General section, change the Course Full Name and Course Short Name to represent the courses that were merged.
- Example: Merged sections 01 and 02 of MATH-110 modify the Course Full Name to be MATH-110-01/02: ……….
- Example: Merged cross listed courses for WGST 314 and ENGL 314 modify the Course Full name to be WGST-314/ENGL-314: ……….
Now, you will need to hide the second course so that the students don’t see both: - Access the second course (the one that was merged in the first steps).
- Locate the green gear icon on the upper right hand side of the page. Click on the drop-down menu and click Edit Settings.
- In the General section, locate the Course Visibility drop down menu.
- Select Hide from the drop down menu.
- Scroll to the bottom and press the Save and Display.
Hints:
- If you would like to automatically create a group, for communication and other purposes, select Create New Group from the Add to group drop down menu prior to pressing Add Method.
If you need to undo a merge, follow steps 1 - 4 above, but when you get to the Enrollment Methods screen, press the X icon next to the course name to remove the merge.

Resources:
- More details and images are available at https://docs.moodle.org/30/en/Course_meta_link.
Related articles