Versions Compared

Key

  • This line was added.
  • This line was removed.
  • Formatting was changed.

How do I set up self enrollment in my course?

Step-by-step guide

  1. Log into OnCourse and access the course that will be using Self Enrollment.
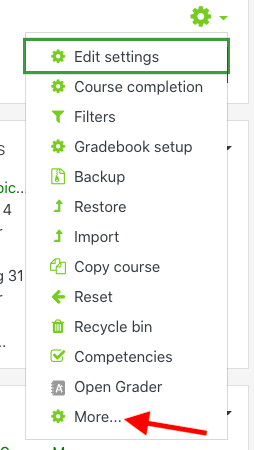
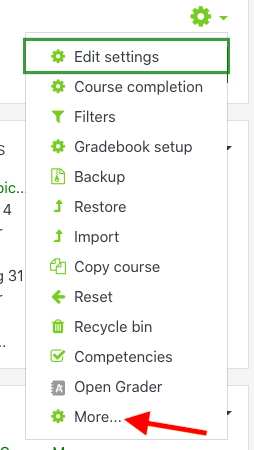
  2. Locate the green gear icon on the upper right hand side of the page. From the drop-down menu click on More. 
    From the drop-down menu, click on More to access more course administration choicesImage RemovedImage Added


  3. Next, click on the Users tab.
  4. Click the “Enrollment Methods” link.
  5. In the list of Enrollment Methods, locate the Self Enrollment option.
    1. Click the eye icon with a line through it to turn on self enrollment.
      By clicking the enrollment methods link, you are able to turn self-enrollment on or off by clicking the eye icon
  6. Return to the course homepage.
  7. Copy the URL link for the course and provide this link to the students you would like to self enroll.


Info

Hints:

  • If you would like to include a password after turning on self enrollment, press the gear icon. In the Enrollment key field enter in a password and press Save Changes. When providing the course link to students, also provide the enrollment key.

Resources:

  • Student instructions for self enrollment are found at https://answers.fredonia.edu/x/xoAg.
  • If you would like to share these directions with your link (and enrollment key if used) follow these steps:
    • Open the file: https://goo.gl/8NouQh.
    • In the File menu choose Make a Copy.
    • Edit the file to include your course link and enrollment key.
    • Set the sharing rights and share the file with your students.

Short URL to this page: 

...

Live Search
sizelarge
additionalpage excerpt
placeholderSearch Answers
typepage

...