How do I set up self enrollment in my course?
Step-by-step guide
- Log into OnCourse and access the course that will be using Self Enrollment.
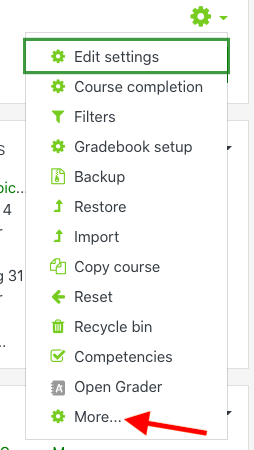
- Locate the green gear icon on the upper right hand side of the page. From the drop-down menu click on More.
- Next, click on the Users tab.
- Click the “Enrollment Methods” link.
- In the list of Enrollment Methods, locate the Self Enrollment option.
- Click the eye icon with a line through it to turn on self enrollment.
- Click the eye icon with a line through it to turn on self enrollment.
- Return to the course homepage.
- Copy the URL link for the course and provide this link to the students you would like to self enroll.
Hints:
- If you would like to include a password after turning on self enrollment, press the gear icon. In the Enrollment key field enter in a password and press Save Changes. When providing the course link to students, also provide the enrollment key.
Resources:
- Student instructions for self enrollment are found at https://answers.fredonia.edu/x/xoAg.
- If you would like to share these directions with your link (and enrollment key if used) follow these steps:
- Open the file: https://goo.gl/8NouQh.
- In the File menu choose Make a Copy.
- Edit the file to include your course link and enrollment key.
- Set the sharing rights and share the file with your students.
- Open the file: https://goo.gl/8NouQh.
Short URL to this page:
Related articles
