How do I divide my course into groups?
Step-by-step guide
Need more help? Watch this video guide on Creating Groups in FREDLearn.
- Log in to FREDLearn.
- Access the course you would like to create groups in.
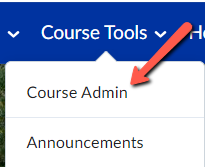
- Navigate to Course Tools and select Course Admin from the drop down menu.
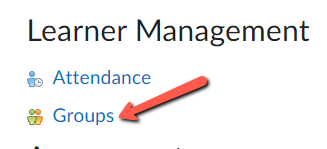
Press the Groups link.
- Press New Category. Groups are organized into Categories.

- Name the Category. You may want to name it after a particular Assignment or Group type.
- Include a Description. This is a good place to let students know what they need to do. Particularly if you are using a Self-enrolled group.
- Choose your Enrollment Type.
- # of Groups- no auto enrollment. Instructor assigns groups.
- Groups of #. Use when you know how many users you want in each group.
- # of Groups- Use when you know how many groups you want and you want FREDLearn to populate the groups.
- Groups of # self enrollment.
- # of Groups self enrollment.
- # of Groups, capacity of # self enrollment. Selecting this option creates a specified number of groups with a specified number of enrollments per group.
- Single user groups.
- If you've selected the Enrollment Type # of Groups, choose the Number of Groups. If you've selected the Enrollment Type Groups of #, you'll be prompted to enter the Number of Users.


9. Restrict Enrollments to. The default is No restrictions. We recommend leaving this set to the default unless you wish to make subgroups.
...
12. Additional Options. You have the option to set up discussion areas or assignments. We do not recommend using lockers as the upload limit is small. Use Google Drive instead.

13. Press Save. You'll see a message that your groups are being created. The process may take a few minutes.
...
- If you've selected the Enrollment Type # of Groups- no auto enrollment, you will need to assign the groups. Navigate to Course Admin > Groups.
- On the Manage Groups screen, choose the relevant Category from the drop down menu.

3. Next, click on the relevant group to which you wish to assign members. The Group names are in blue and hyperlinked.
4. Press the Enroll Users button.

5. Select the users you wish to enroll in the Group and then press Save.

| Info |
|---|
Resources:
 |
...
| Live Search | ||||||||
|---|---|---|---|---|---|---|---|---|
|
...